Showing posts with label recipes. Show all posts

Friday, May 17, 2019

FlossTube #11 Recap

FlossTube video #11 was released May 17, 2019. If you missed it you can find it here:


Mother's Day Lasagna Recipe

Here is the recipe I made for Mother's Day. This is my mom's recipe and it is super easy. You can make it the day or night before. Don't cook it. Just cover it and put it in the refrigerator.


Cook Noodles

Cook 9 lasagna noodles per package directions

Brown the following:

1 lb ground beef (I actually used 3/4 lb Italian Sausage (not breakfast) and 3/4 lb ground beef - it was more meat but it worked great and adds a little bit of spice)

1 Tbls minced onion

Simmer

Add the following to the meat and simmer
2 lb jar of spaghetti sauce. (you can't get 2 lb jars anymore so I buy one large jar and one small jar)

1 tsp garlic salt  (I used a couple of cloves of real garlic, minced, but I needed to add some garlic salt too as it tasted a little flat while the sauce was simmering

1 tsp Italian seasoning

Mix together

In a separate bowl mix together 1 small carton of cottage cheese, 1 egg and dash pepper

Layer

In a 9x13 pan (I use a glass baking dish, especially if I'm making the day before), place a layer of noodles, layer of beef, layer of cottage cheese, layer of mozzarella cheese slices (shredded fresh mozzarella is MUCH better). Repeat layers ending with mozzarella. Sprinkle with Parmesan (I grate fresh).

Bake

Preheat oven to 350 and bake for at least 45 minutes. Should be nice and brown. If it browns too fast place some aluminum foil over top for a while.  Let stand 15 minutes before serving

Amazon


If you're interested in the products discussed such as the Bees Wax Wraps, the Microphone I used in the video and the Easy Grid thread - you can find them in my Amazon 


Project Bags

The project bags I featured were

Vintage Valentine by MadeByMamaJoan
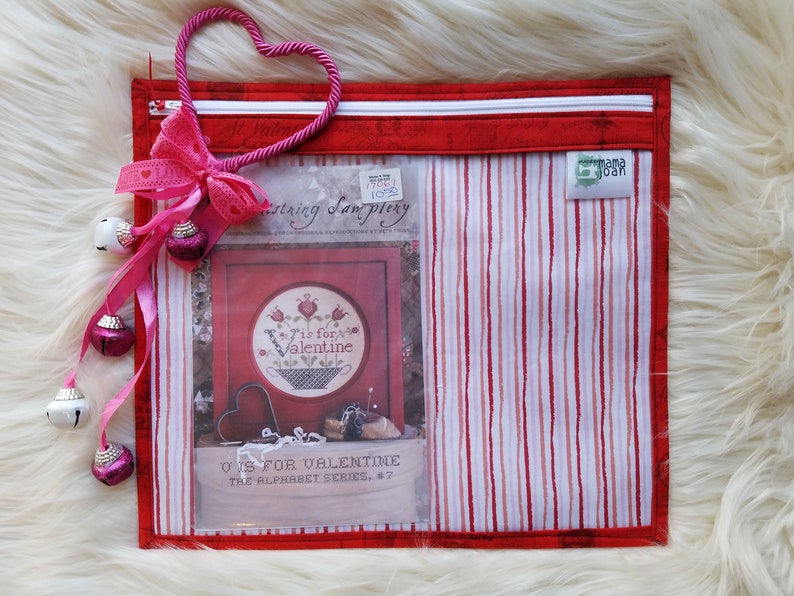
image 0


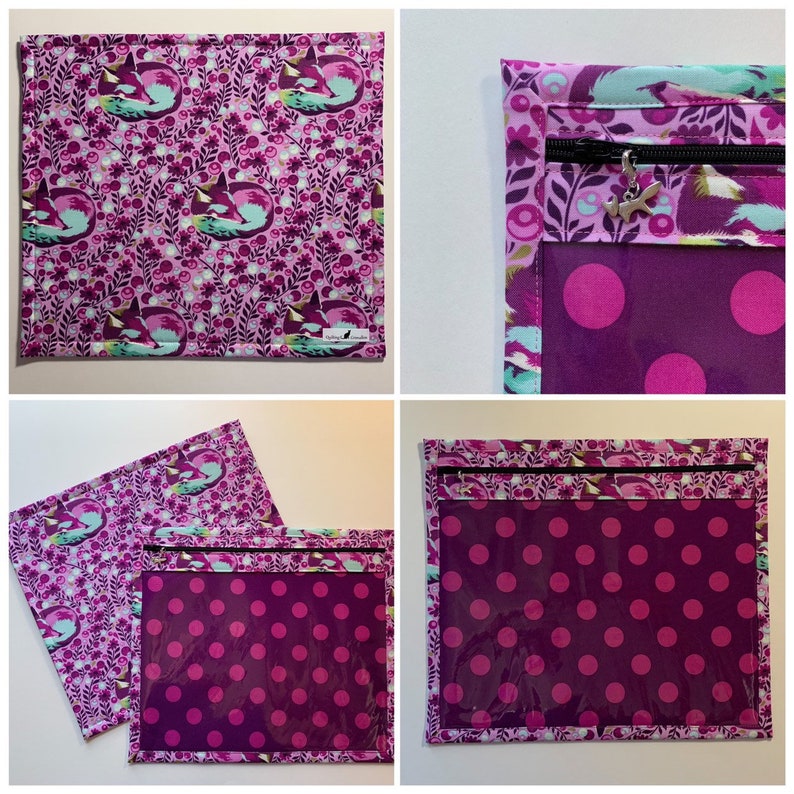
Tula Pink  Foxes by QuiltingGrimalkin


image 0


Featured Charts

Some of the designs featured from our website include these adorable Crazy Patch Owls by Cross Stitch Wonders. There is a series of 12 to choose from.

Click here to see all of our Cross Stitch Wonders Designs (including these)


Wednesday, June 11, 2014

Strawberries and Raspberries with Sweet Syrup (9-06-2014)

This recipe is one of the first things I learned while attending cooking classes at L'atelier de Chefs.  click here to see the recipe in full. The French name translates to Soup of Strawberries and Raspberries a la Cardamon.  Basically it is fresh berries with an awesome sweet sauce. You may read through this and think "That's a lot of work just to put a sweet sauce on my strawberries" - but trust me - try it and and you'll be so glad you did. I've made it four times already.

Go to the store
and buy a scale
Just do it!

The web site states it takes 10 minutes to prepare - I would say 20.  Ingredient amounts are listed in metric. You can convert them if you want but I strongly advise you get a kitchen scale. I didn't think I would like using it but I do. Very precise and you don't have to have specific measuring cups. Just grab whatever container is handy and place it on the scale before turning it on. Then measure the desired amount.


You don't want
crushed cardamom
You will need:
500 grams of Strawberries
125 grams of Red Raspberries
25 cl water
2 cl white balsamic vinegar
4 Cardamom capsules (I had some trouble finding these)
75 grams white granulated sugar (in French this is called "sucre en poudre" i.e. "powdered" - but it is NOT powdered - it is regular sugar
6 pieces Speculoos cookies or biscuits
100 grams honey
1 lemon


I measure all of my ingredients out first. Then wash your berries and lemon. Leave the raspberries whole, but cut the top off the strawberries and cut them in half or quarters if they are large. Put them in a bowl together.

Don't zest too deep.
Just until the white starts to show
Zest the lemon. You will only use the zest. Save the lemon for a nice glass of lemonade.

Get out two sauce pans. In one put the sugar, water and two of the cardamom capsules. In the other put the honey, lemon zest and the other two cardamom capsules. Bring both pots to a boil. Remove from heat and combine and stir the contents of both together.

Allow this to cool.


Don't include the zest or cardamom
Once cooled add the vinegar. Pass all of the syrup through a fine strainer to remove the zest and cardamom pieces. Pour the filtered syrup over the berries and gently stir to coat. You should have quite a bit of liquid in the bowl with the berries.


Spiced cookie
Kind of like gingerbread cookie
Put the berries with the syrup in the fridge to cool completely. Let them set for at least 45 minutes. When ready to serve, separate the berries into small serving containers. Take the Speculoos biscuits and put them in a bag and crush them (I use a rolling pin). Sprinkle the crushed biscuits over the berries. Make sure to include some of the soupy syrup.

Enjoy!!

Comments are welcome. Please let me know if you try this recipe and what you think of it.

Saturday, May 31, 2014

“I think every woman should have a blowtorch.” ― Julia Child (31-May-2014)

Kitchen Blowtorch
On my wish list
How could I not quote Julia Child when I write about the cooking classes I took in France? After all, she is credited with bringing French cooking to American kitchens. Although I don't have a blowtorch yet, it is on my wish list.

When I signed up for French language classes I had the option to add 4 or 8 cooking classes as well. Of course I chose 8 (why do anything half-way). In retrospect I would have chosen four to start with and then spread out additional classes over time.

The school I attended is called L'atelier des Chef. You can read about the school at the link provided (translate if needed). The idea is simple: You sign up for a class of anywhere from 30 minutes to four hours. You attend with up to 16 people and have nice workstations in a large kitchen classroom. You are greeted by a chef who goes over what you are going to make. He demonstrates the different techniques you will use and then you are on your own to start preparing your ingredients. There are up to 4 people at each workstation and you help each other prepare all of the ingredients for your recipe together. After that you move to the oven and stove area and the chef demonstrates what you need to do to finish cooking the meal.

Yep I (helped) make this. All veggies on the bottom
with a ham mousse, homemade 'crackers' and
small pieces of bread toasted with
mushed black olives.
Click here for the recipe
Some of the basic techniques I was shown included:

  1. How to correctly hold and use a large knife to chop or cut your ingredients.
  2. How to de-vein a large prawn (yuck)
  3. How to julienne meat or vegetables (very thin slices)
  4. How to peel vegetables. No biggie here except that we peeled almost everything including tomatoes, peppers and zucchini. I have never peeled tomatoes or peppers for a recipe before.
  5. How to sear meat to the correct coloring in a super hot pan
  6. How to use a Chantilly siphon
  7. How to simply caramelize apples or pears.
I took only 60 and 90 minute courses. Some courses are marked "a Emporter" - this means you make the recipes and then take them home with you. The other classes you stay at the school and eat what you made with your classmates. Presentation is stressed and you take your time to enjoy the meal.

Entrees from my last class. They were FABULOUS.
Especially the ravioli with prawns and ham on the inside
I won't go into detail about the classes I took but here are a few quick observations and thoughts I have about my time.
  1. It's a lot of fun! A little intimidating for me at first, and also made for VERY long days but it was worth it in the end.
  2. I had three different chefs teaching the classes I took and none of them spoke English. All were very nice but one took a little more time to make sure I understood while the others took no notice that I could only understand 1 in 20 words.
  3. Not knowing French didn't make a huge difference. Luckily cooking is a very visual thing. I would watch the demonstrations and figure out what I was supposed to do. The part I regretted was not being able to understand the little tips the chef would throw out, or instructions about storing and cooking temperatures.
  4. Surprisingly the recipes were not handed out at class. It was assumed you had a web site account and had signed up over the Internet and you could print out the recipes there.
  5. Six or fewer students is optimal. I had one class with 12 and one with 16 students. These were by far the least enjoyable courses. Too many cooks in the kitchen!
  6. The ingredients we used were AMAZING - so fresh and some things I had never dreamed of using before. For example lemon con fit, fennel, and duck. All herbs were fresh and it truly made a huge difference.
  7. Unless you're an experienced cook take the preparation times for the recipes on the web site and double them. Class always ran late and we had at least 50% of the prep work and ALL of the cleanup work done for us. In addition we worked in groups to prepare the ingredients. It takes MUCH longer in your own kitchen at home.
  8. Translating the recipes from French to English isn't easy. I copy them and put them into Google Translate but there are a lot of ambiguous translations. Ingredients especially are hard to translate. I've made three different mousse dishes and tried making whipped cream twice and I'm still not buying the right types of cream or preparing it correctly. Things move so quickly in class that you just can't remember everything you learned. Having all in a foreign language makes it even more difficult.
  9. The food is AMAZING. There is nothing that I really didn't enjoy.There are a couple of things I probably won't make but most of the recipes I will try at home.
  10. Be prepared for a LOT of cleanup. Each recipe uses a lot of dishes and pots and pans. In class they cleaned up for us. Doesn't seem to work the same at home.
  11. Be prepared to spend the big bucks on new pans and knives. Once you've used quality equipment you won't want to go back to Walmart Specials
  12. Be prepared to have fun (and want to buy) a lot of new kitchen gadgets. I already splurged on a siphon to make mousse and Chantilly (whipped cream). So much fun to use CO2 cartridges in my kitchen. I have a list of other things I want to get.
  13. Be prepared to never want to use packaged ingredients or dried herbs again. Flavors are amazing.
  14. Other than the deserts the French recipes I've tried are basically good for you. Most have nothing but fresh ingredients with tons of vegetables. But you get caught with the calories with the heavy cream and oil used in many dishes. Entrees (appetizers and deserts are the worst) but honestly I think I can handle being 'fluffy' if I can eat this good.
Hope you enjoyed the article. When I get better at making some of the recipes on my own I'll try to post about those. Feel free to share and please leave a comment!

Saturday, October 17, 2009

Crock Pot Chocolate Cake Recipe

My friend gave me this. I haven't tried it yet but she says it's great. I'd never heard of a crock pot cake before so thought I'd post. Have you tried one? Feel free to coment.

1 Chocolate Cake Mix
1 Sm Choc Instant Pudding
1 cup Water
4 Eggs
¾ cup Oil
2 cups Sour Cream
1 tsp Vanilla
1 – 12 oz pkg Chocolate Chips

Mix together above ingredients (thru Vanilla). Stir in Chocolate Chips.

Cook in a greased crock pot on low for 6 hrs or on high for 3 hrs. (You may have to experiment a bit on the time – mine was right on 3 hrs on high – it is better if not overdone.)

Serve with different toppings: Cherry Pie Filling, Frosting, Cool Whip, Ice Cream etc.

Friday, June 12, 2009

Chocolate Chip Oatmeal Cookies

Here is my forever favorite chocolate chip cookie recipe:

Preheat oven to 350.

Cream:
2 sticks of butter or margarine (softened)
3/4 cup white sugar
3/4 brown sugar

The creamier you can get this the better

Add 2 eggs - beating in one at a time
Mix in well:
1 teaspoon vanilla
1 teaspoon baking soda dissolved in 1 teaspoon warm water
1 teaspoon salt (I don't put quite this much in)

After the above is mixed really well...

Add 2 cups of flour about 1/2 cup at a time mixing well.

Set electric mixer aside.

Fold in 1 cup to 1 1/2 cup oatmeal.
Fold in 1 cup chocolate chips.

Grease your cookie sheets. Spoon dough onto cookie sheets. Bake at 350 for about 9 minutes. Don't over bake them unless you like them crunchy.

If you prefer to make bars instead of cookies pour all of the dough into a 9 x 13 pan and spread evenly (don't grease). Start checking after 35 minutes, may take up to 45 minutes. Remove and cool before cutting.

If your cookies are too flat - add a little more flour. Don't want or have the oatmeal - use 2 1/2 cups floor instead of just 2 cups.

Enjoy!

Thursday, June 11, 2009

Special K Bars - Favorite Snacks

OK - we just won't discuss calories in this one.

Here is one of my all time favorite snacks - Special K bars with chocolate/butterscotch topping.

To make:

Put 1 cup Karo syrup and 1 cup white sugar in large sauce pan. Heat on medium heat until sugar dissolves and starts to boil. Do NOT overheat as it will burn - let it get to small bubbles throughout - stirring frequently. No need for large rolling boil.

Turn off or remove from heat and immediately add 1 cup creamy peanut butter. Stir until peanut butter is completely melted into syrup mix.

Immediately add 6 cups Special K (I like Special K a LOT better than Rice Krispies). Fold gently until cereal is completely coated.

Put mixture into ungreased 9 x 13 pan and spread evenly. Set aside (or in fridge) to cool.

In microwavable bowl add 1 cup chocolate chips and 1 cup butterscotch chips. (You can use a double boiler if you want, but I prefer microwave). In short increments (30-45 seconds) heat the chips on high. Remove and stir. Repeat until you get chips completely mixed and nice and creamy. Be careful - it is very easy to burn chocolate chips. Do not turn on and leave for more than 45 seconds at a time.

Pour chocolate mixture over previously prepared mixture and let set until topping has cooled. You can refrigerate to cool - but bars will be very hard to cut if you leave them in the fridge.

Cut, eat, and enjoy!!!

Sunday, February 22, 2009

What to Serve at Bunco #1

When it's my turn to host Bunco I'm always looking for something good to serve. Usually it's an appetizer out of a box - as I don't do well with multiple-ingredient recipes.

But this last week I tried something new from the Better Homes and Gardens magazine "Appetizers". Great issue and I hope to try many more recipes - especially the drinks!
For Bunco I made Crab and Horseradish Havarti Dip - Yummm!
Prep: 15 minutes Bake: 25 minutes Oven: 350F

Ingredients:
1 8oz package of cream cheese, softened
1 1/4 cup shredded horseradish and chive Havarti cheese. (I couldn't find this so I used Havarti cheese and added 2 teaspoons horseradish and cut up some fresh chives)
1/3 cup dairy sour cream
1/4 cup mayo or salad dressing
6 ounces cooked crab meat
1 cup shredded fresh baby spinach

1.) Preheat oven to 350F. In bowl combine cream cheese, Havarti cheese, sour cream and mayo. Beat with electric mixer on medium speed until well mixed. Fold in crab meat and spinach.
2.) Transfer mixture to a 1-quart souffle dish or shallow backing dish. Bake about 25 minutes or until heated through. Serve with assorted breads. Makes 3 cups.
I served with a crispy french bread loaf cut very thin. Then I made shaped bread in a Pampered Chef Bread tube and cut that thin for a softer bread. Then I made Pillsbury Bread Sticks which were perfect for dipping.

This magazine is FULL of great appetizer recipes.
You can buy your own copy on Amazon: